 Con's place
Building a Dynamic HTML Renderer with Nunjucks and JSON Templates
Posted on • Tagged with dev accessibility dsf ci-cd
I’ve been working on a dynamic HTML renderer (govcy-frontend-renderer) and I thought it might be interesting to explain how it works.
Project Overview
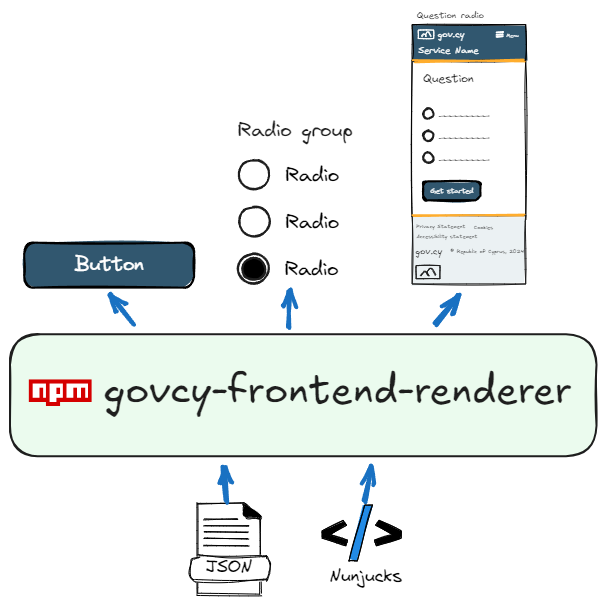
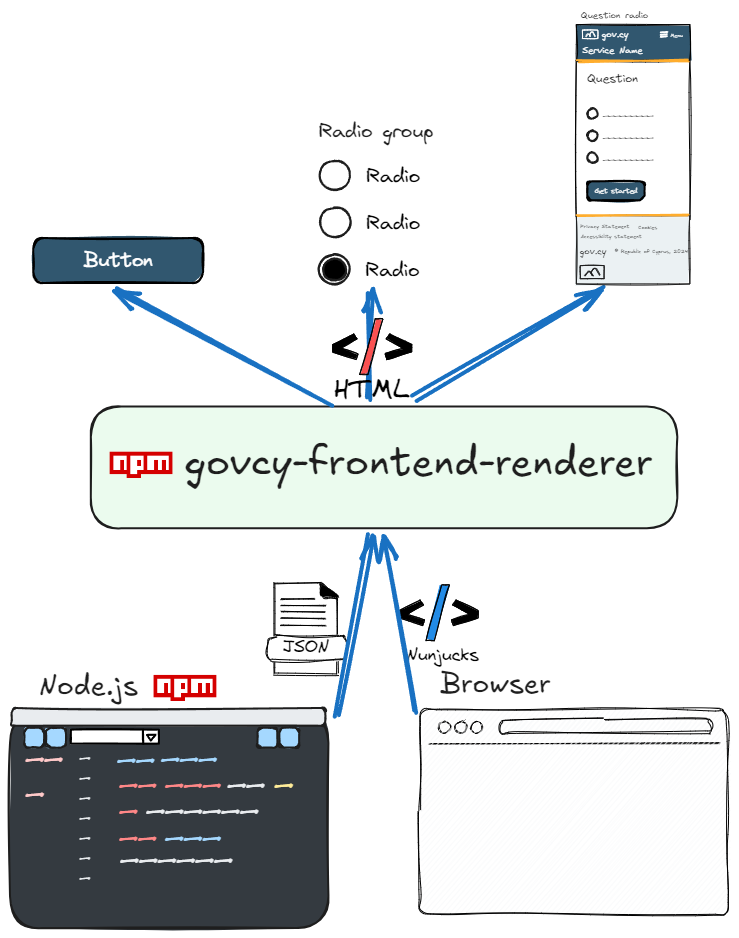
The govcy-frontend-renderer project is structured to support the rendering of HTML elements based on the gov.cy Unified Design System (UDS). The goal is to enable the creation of gov.cy UI components using either structured data (JSON), or a powerful template engine (Nunjucks ), without requiring any HTML knowledge. This approach offers significant flexibility and ease of use, making the transition from data to UI seamless. It has a wide range of applications, such as:
- Rapidly creating prototypes using static site generators (check out this prototype example ).
- Rendering the UI in applications (check out this SPA application example ).
- Rendering the UI in low code products.
By leveraging JSON and Nunjucks, this project simplifies the process of building consistent and reusable UI components that adhere to the UDS guidelines.
Here is an example of how the package can be used:
import { govcyFrontendRenderer } from '@gov-cy/govcy-frontend-renderer';
const renderer = new govcyFrontendRenderer();

// Define the input data
const inputData =
{
    "site" : {
        "lang" : "en",
        "title" : {"en":"Service title", "el":"Τιτλός υπηρεσίας"},
        "headerTitle" : {"en":"Header title", "el":"Τιτλός επικεφαλιδας"},
        "description" : {"en":"Service description", "el":"Περιγραφή υπηρεσίας"},
        "url" : "https://gov.cy",
        "cdn" : {
            "dist" : "https://cdn.jsdelivr.net/gh/gov-cy/govcy-design-system@3.0.0/dist",
            "cssIntegrity" : "sha384-1zLHWOtnS0hOIz5mVEPZp0UH5gUE6eo0CQcCGA3sF2TyYhHyKOd3Ni8Iy/NjEASU",
            "jsIntegrity" : "sha384-zOuDuogVaaTveh/Ou2iYwCk14zFiSmMk7Ax8yRnXDtOJMyKZH5+ZNibNVwZSKtw+"
        }
    },
    "pageData": {
        "title": {"en": "Page title", "el": "Τιτλός σελιδας"},
        "layout": "layouts/govcyBase.njk",
        "mainLayout": "max-width"
    }
};

// Define the JSON template
let inputJson =
{
    "sections": [
        {
            "name": "main",
            "elements": [
                {
                    "element": "form",
                    "params": {
                        "elements": [
                            {
                                "element": "textInput",
                                "params":
                                {
                                    "label":{"en":"What is your name?","el":"Ποιο είναι το όνομα σας;"}
                                    ,"id":"name"
                                    ,"name":"name"
                                    ,"isPageHeading": true
                                    ,"autocomplete":"tel"
                                }
                            },
                            {
                                "element": "button",
                                "params":
                                {
                                    "text":{"en":"Continue","el":"Συνέχεια"}
                                    , "type":"submit"
                                }
                            }
                        ]
                    }
                }
            ]
        }
    ]
}
;

// Render
let rtn = renderer.renderFromJSON(inputJson, inputData)
console.log(rtn);
More details and instructions on how to use the package are included in the projects read me file.
Rendering HTML
The project uses Nunjucks, a powerful templating engine, to process templates and generate HTML. Every call to render, goes through the govcyFrontendRenderer JS class, which supports two types of input templates: Nunjucks and JSON templates.
govcyFrontendRenderer uses the govcyElement Nunjucks macro, which is the core of the rendering system. It is responsible for rendering individual design elements. The macro imports the necessary Nunjucks templates for each element and calls the appropriate macro to render the element. It uses the component argument to decide which macro to import and use, and the params argument for the element’s parameters.
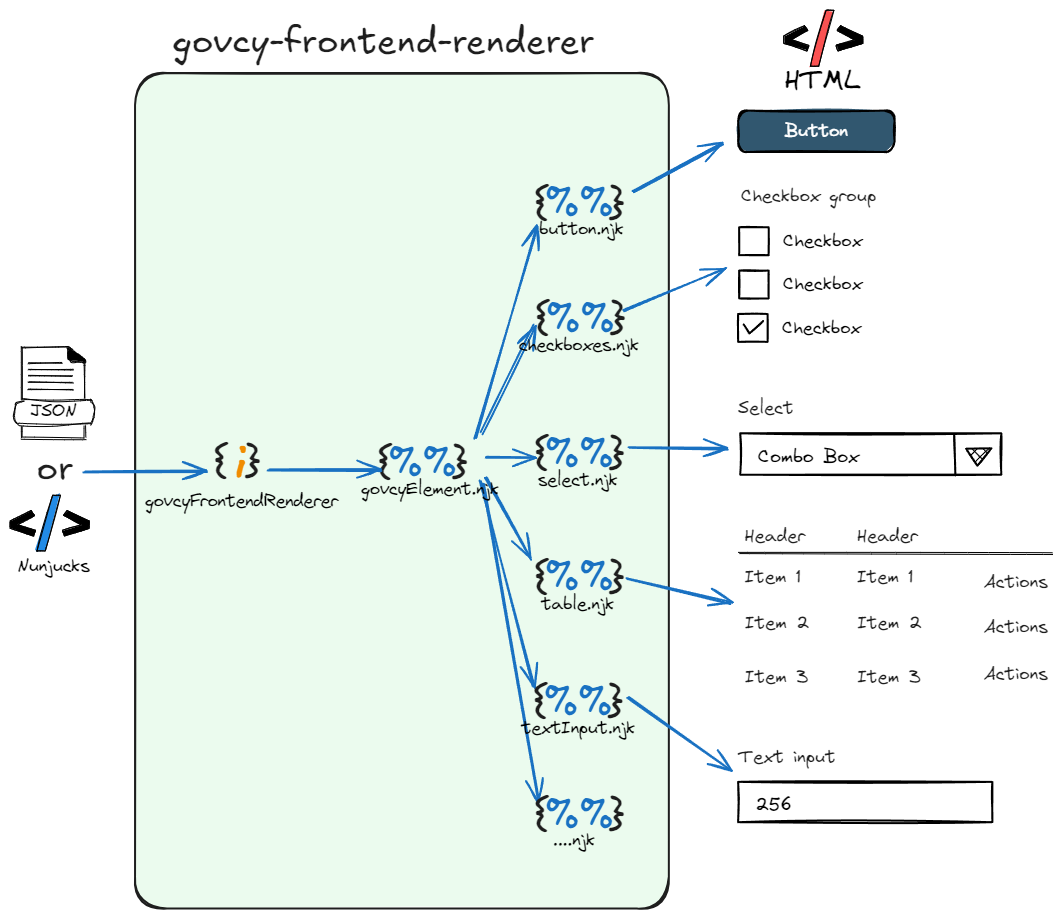
Here’s a usage example of govcyElement macro
{{
    govcyElement(
        "button",
        {
            text:{en:"Continue",el:"Συνέχεια"},
            variant:"success",
            id:"success-button"
        }
    )
}}
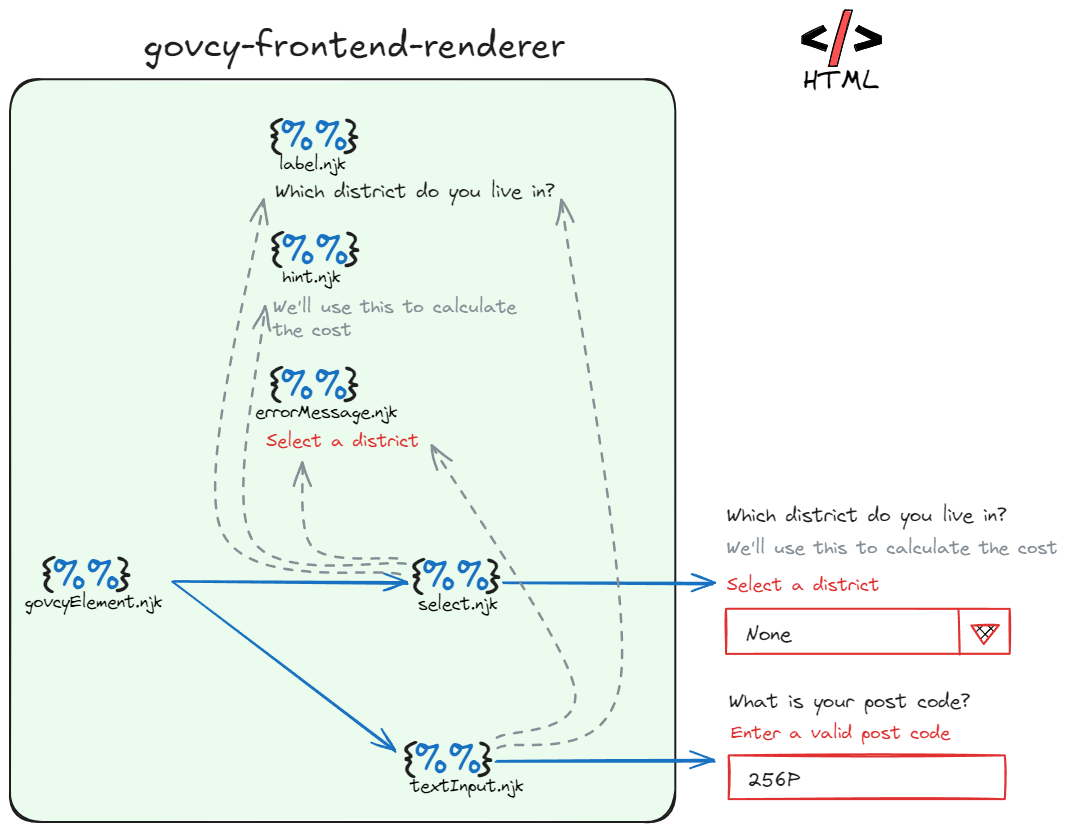
Reusability and consistency
The project is designed to ensure reusability and consistency. Regardless of whether the input template is, JSON or Nunjucks, the resulting HTML is rendered using the same Nunjucks macros, guaranteeing consistent output.
It also reuses common elements across different components, such as labels, hints, and error messages.
Adding more elements
The project is build to be flexible and easily extensible, allowing the team add more elements over time.
The process for adding more elements is very simple.
- 1. Element’s nunjucks macro file. Create an
njkfile for the macro in the directorysrc\njk\elements. - 2. govcyElement.njk. Update the
src\njk\govcyElement.njkfile macro with the new component, by adding the macro name in themacroBlocksarray.
Before going live, all changes are of course tested.
Testing
Testing is particularly important, as we wanted to build trust and encourage usage. Every element’s rendered HTML is verified against the definitions in the Unified Design System.
For every element supported by the project, the following process is followed:
- 1. test.njk. The
test\test.njkfile is updated, rendering all variants of the element withgovcyElement. - 2. test.json. The
test\test.jsonfile is update with the same variants of the element as intest\test.njk. - 3. Manuall test. Changes are manually tested on local host by running
npm startagainst the definitions in the Unified Design System - 4. Unit test script. The
test\moca\unit.test.mjsfile is updated with tests for all the element’s variants. - 5. Run unit tests. Unit tests are run by
npm run test
Versioning
Having a versioning policy is crucial, especially for projects intended to be used by third parties. In this project, the Semantic Versioning (SemVer) is followed to manage versions using the three-part version number: MAJOR.MINOR.PATCH.
Before releasing a new version the following process is followed:
- Update Version Number: the version number in
package.jsonis updated according to the changes made. - Update Changelog: The
CHANGELOG.mdfile is updated to document the changes included in the new version. - Local tests: All changes are tested locally.
- Pull request tests: Unit tests are run using GitHub Actions on every pull request.
- Tag and Publish: Tagging and publishing the new version on npm is done using GitHub Actions on every merge to the Main branch.