 Con's place
Automating accessibility: Site-wide testing and reporting guide
Posted on • Tagged with dev accessibility eleventy ci-cd
I’ve created a script to automate accessibility checks across my site, save the results in JSON, and display them on my accessibility page. While it may sound daunting, it actually wasn’t that hard to do, so I thought it might be interesting to share how I did it.
Before diving in, it’s important to note that automated testing provides valuable insights and suggestions for best practices, but it is not enough and it should not replace manual accessibility testing. Manual testing is crucial to ensure comprehensive accessibility compliance.
Dependencies
I use Eleventy to build my site, which is a Node.js based static site generator, so it made sense to use Node.js and NPM for my test script.
My weapon of choice for accessibility testing is Pa11y which I use frequently to automate my tests. Here’s why I like Pa11y so much:
- Pa11y supports multiple accessibility standards, including WCAG 2.1, and is highly customizable allowing you to set the standard to test against.
- It offers a simple command-line interface, making it easy to integrate into various workflows, including CI/CD pipelines.
- It provides detailed reports of accessibility issues, including the type of issue, the element causing the issue, and suggestions for fixing it.
- Pa11y can be easily integrated with other tools and frameworks, such as Eleventy, to automate the testing process and generate reports.
- It has an active community, and it’s package health score is high on snyk Advisor.
So first things first, I needed to install Pa11y with this command
npm install pa11yThe script
The script is very simple really, it just goes through an array of pages, runs pa11y to do the tests, and save’s the results in a JSON file.
import Eleventy from "@11ty/eleventy";
import pa11y from 'pa11y';
import { writeFile } from 'fs/promises';

(async function() {
    let elev = new Eleventy();
    // retrieve Eleventy content
    let pagesJson = await elev.toJSON();
    // filter only pages ending with `/`.
    const filteredPagesJson = pagesJson.filter(item => item.url.endsWith('/'));
    // define the server URL. Note this means the test is run on localhost
    let serverURL = "http://localhost:8080";
    console.log(`## Run tests`);
    // run tests
    await testAccessibilityAndSave(filteredPagesJson, serverURL);
})();

async function testAccessibilityAndSave(pages,serverURL) {
    const resultsArray = [];
    let failed = false; // Track failures
    // for each page
    for (var page of pages) {
        if (page.outputPath.endsWith(".html")) {
            try {
                console.log(`Testing ${page.url}`);
                // run pa11y
                const results = await pa11y(serverURL + page.url, {
                    standard: 'WCAG2AA'
                });
                // push results in an array
                resultsArray.push({ url: page.url, issues: results.issues });
                // if there are accessibility issues write on the console
                if (results.issues.length > 0) {
                    console.error(`Accessibility issues found in ${page.url}`);
                    console.error(results.issues);
                    failed = true; // Mark as failed if any issues are found
                }
            } catch (error) {
                console.error(`Error testing ${page.url}:`, error.message);
                failed = true; // Mark as failed if an error occurs
            }
        }
    }

    try {
        // add date and results to the json
        const resultsJSON = {
            date: new Date().toISOString().split('T')[0],
            results: resultsArray
        }
        // write to file on special `_data` folder so Eleventy can convert it into a collection
        await writeFile('src/_data/accessibilityresults.json', JSON.stringify(resultsJSON, null, 2));
        console.log('Results saved to `src/_data/accessibilityresults.json`');
    } catch (fileError) {
        console.error('Error saving results:', fileError.message);
        failed = true; // Mark as failed if an error occurs
    }

    // Exit with code 1 if any tests failed, otherwise exit with code 0
    process.exit(failed ? 1 : 0);
}
I’ve added comments to clarify each step, but here’s a quick summary for better understanding.
Imports
I import pa11y to run the tests and writeFile to write the results in a file. I also import Eleventy so that I can get the pages Eleventy has built. If you don’t use Eleventy you will not need this.
Get the pages to test
Again I use Eleventy so I get the pages using it’s API as follows:
 let elev = new Eleventy();
// retrieve Eleventy content
let pagesJson = await elev.toJSON();
// filter only pages ending with `/`.
const filteredPagesJson = pagesJson.filter(item => item.url.endsWith('/'));
You will notice that I filter the results to items with URL that ends with /. This is because I also build other files such as sitemap.xml or feed.xml which I want to exclude from my tests.
If you do not use Eleventy you probably need to provide the URLs yourself.
Perform the test
All the magic is done with in this line
const results = await pa11y(serverURL + page.url, {
	standard: 'WCAG2AA'
});
The script passes the URL and the standard to test with, which in our case is WCAG2AA.
If any issues are found on a given URL, they will be returned in an array in results.issues.
All the results are pushed into the resultsArray.
Save results in JSON
Before the results are saved, the script adds the date it run in this code segment:
// add date and results to the json
const resultsJSON = {
	date: new Date().toISOString().split('T')[0],
	results: resultsArray
}
It then writes the results in src/_data/accessibilityresults.json. You can really save them wherever you like. I opted to use the folder _data, because Eleventy treats this sort of like a magic folder, and everything inside it gets built into a collection which I can use in my pages.
Running the script
Pa11y needs to be able to access the pages to test them, so if you run your tests on the localhost as I do, make sure the local server is up and running before you use the script.
All you need to do to run the script is this:
node a11y.mjsUsing it in a CI/CD pipeline
I use my script in my development workflow, but it can easily be include in a CI/CD pipeline. The script indicates success or failure with the code segment below, so it should be CI/CD ready:
process.exit(failed ? 1 : 0);I haven’t tried it my self, but you could create a GitHub Action by creating a file under .github/workflows/accessibility-test.yml like this (note: I got this script with the help of AI, I did not test it my self, so it might need some changes, or updates):
name: Accessibility Test

on:
  push:
    branches:
      - main
  pull_request:

jobs:
  accessibility:
    runs-on: ubuntu-latest

    steps:
      # Checkout the code
      - name: Checkout Code
        uses: actions/checkout@v3

      # Set up Node.js
      - name: Setup Node.js
        uses: actions/setup-node@v3
        with:
          node-version: 18

      # Install dependencies
      - name: Install Dependencies
        run: npm ci

      # Build the site
      - name: Build Site
        run: npx @11ty/eleventy

      # Start a server for the static site
      - name: Start Static Server
        run: |
          npx http-server _site -p 8080 &
          echo $! > server.pid
        env:
          CI: true

      # Run Accessibility Test
      - name: Run Accessibility Test
        run: node a11y.mjs

      # Save Results as Artifact
      - name: Upload Accessibility Results
        if: always()
        uses: actions/upload-artifact@v3
        with:
          name: accessibility-results
          path: src/_data/accessibilityresults.json

      # Stop the server
      - name: Stop Static Server
        if: always()
        run: kill $(cat server.pid)
Using the results files in Eleventy
This section is specifically for those who use Eleventy, but the underlying principles can be adapted for other implementations as well.
Show the report in a page
As I mentioned before, Eleventy treats the _data folder like a magic folder and automatically turns all json files into collections. This makes my life very easy. All I need to do to show the results in a page, is to use one of the Eleventy supported template engines and loop through the accessibilityresults collection.
I like using Nunjucks so in my accessibility.njk file I use the following code segment to display the report:
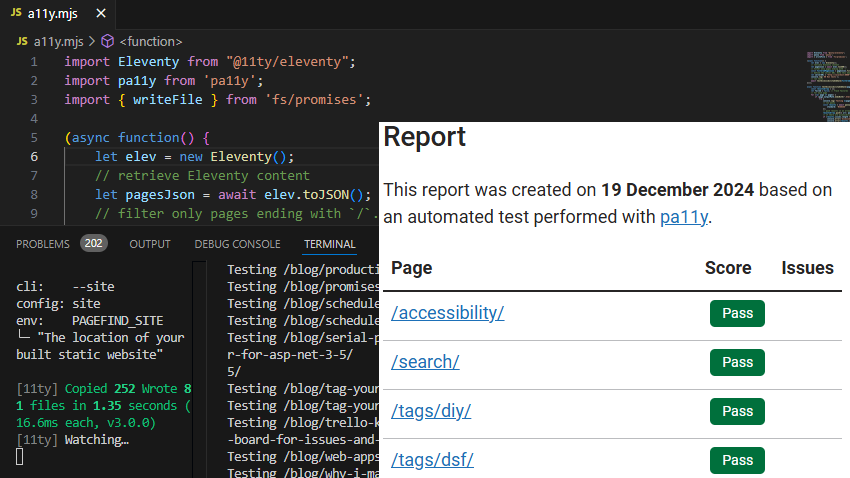
<h2 id="report">Report</h2>

<p>This report was created on <b><time datetime="{{ accessibilityresults.date }}">{{ accessibilityresults.date | dateOnly }}</time></b> based on an automated test performed with <a href="https://pa11y.org/" target="_blank">pa11y</a>.</p>

<table>
    <thead>
        <tr>
            <th scope="col">Page</th>
            <th scope="col">Score</th>
            <th scope="col">Issues</th>
        </tr>
    </thead>
    <tbody>
    {% for result in accessibilityresults.results %}
    <tr>
        <td><a href="{{ result.url }}">{{ result.url }}</a></td>
        <td>{% if result.issues.length > 0 %}<span class="fail-tag">Fail</span>{% else %}<span class="success-tag">Pass</span>{% endif %}</td>
        <td>
             <ol>
                {% for issue in result.issues %}
                <li>{{ issue.message }}</li>
                {% endfor %}
            </ol>
        </td>
    </tr>
    {% endfor %}
    </tbody>
</table>
Oh, I forgot to mention, I’ve also created the following CSS classes for the pass and fail tags:
.fail-tag {
    margin-left: .35rem;
    margin-bottom: 5px;
    border-radius: 5px;
    font-size: 14px;
    padding: 3px 12px;
    display: inline-block;
    vertical-align: top;
    width: fit-content;
    width: -moz-fit-content;
    background: #D4351C;
    color: #ffffff;
    text-decoration: none;
}
.success-tag {
    margin-left: .35rem;
    margin-bottom: 5px;
    border-radius: 5px;
    font-size: 14px;
    padding: 3px 12px;
    display: inline-block;
    vertical-align: top;
    width: fit-content;
    width: -moz-fit-content;
    background: #00703C;
    color: #ffffff;
    text-decoration: none;
}
Bonus: show a success or fail badge
I also show a success or fail badge of my test on every page. To do that, I added a global data in my .eleventy.js file with this code segment:
  eleventyConfig.addGlobalData("accessibilityStatus", () => {
    const data = JSON.parse(fs.readFileSync("src/_data/accessibilityresults.json", "utf-8"));
    const allNoIssues = data.results.every(page => page.issues.length === 0);
    return {
      date: data.date,
      results: data.results,
      allNoIssues: allNoIssues
    };
  });
I then use the accessibilityStatus in my njk template like this:
<a href="{{ '/accessibility/#report' }}" class="general-a11y-badge">
{% if accessibilityStatus.allNoIssues %}
<img src="https://a11ybadges.com/badge?logo=smile&text=a11y_passed&badgeColor=green" alt="{{ site.localization[locale].a11y_success}}">
{% else %}
<img src="https://a11ybadges.com/badge?logo=frown&text=a11y_failed&badgeColor=red" alt="{{ site.localization[locale].a11y_fail}}">
{% endif %}
</a>
I use a11y-badges to create the badges, which is a more accessible version of shields.io.
Here are the css classes I use for the badges:
.general-a11y-badge img {
    width: auto !important;
    height: 24px !important;
}
Conclusion
So there you have it! I hope this post can help you implement your own automated accessibility check process.
Automating accessibility checks can save you a lot of time and help you maintain a more accessible website. However, remember that automated tests are not a substitute for manual testing. Use them as a tool to catch common issues and guide your manual testing efforts.
Happy testing!